Showing posts with label Cooking. Show all posts
Thursday, December 4, 2014
TINY TIDBIT FOR TODAY - Peeling a Banana
*Thanks to my friend Marilyn who sent me this tip!
Friday, May 2, 2014
Tiny Tidbit for Today - Avocado Dip
Tuesday, March 25, 2014
Tiny Tidbit for Today - Stale Crackers
Stale crackers and chips can be revived. Just heat them on a cookie sheet in the oven at 250 degrees for about five minutes. Voila...never throw out stale crackers or chips again!
Wednesday, January 29, 2014
TINY TIDBIT FOR TODAY - Burned Potatoes
If you scorch potatoes* while boiling them, put a piece of bread in the pot and cover with the lid. This will remove the scorch/burn taste.
*Applies to rice and other veggies.
Have a great day! Esmee
Saturday, November 23, 2013
SUGAR, SUGAR
Okay...I am thinking everyone knew this but me. I think I discovered it about five years ago. Considering I have been emptying sugar packages for over 50 years??? Well, what can I say? Nothing!
In case you are just now starting out cooking or have been cooking for over 50 years and didn't know this...
Here's the tip:
Step 1: Unfold the top of the bag of sugar
Step 2: Carefully open one end of the unfolded top to make a spout. Leave one end glued together.
Step 3: Pour into container or canister.
Now how easy was that?
...and that's today's Kitchen Tip 101!
Have a great one-come see me again!
More great tips on the way!
Sunday, February 10, 2013
Pop the Cork
Saturday, February 2, 2013
Perfect Boiled Eggs
I found this method after buying a dozen of 'Great Day' Farmers Market at Walmart. Inside the top of the carton were instructions on "How To Hard Cook An Egg". I tried it and loved it and am now sharing the secret with you.
1. Place the eggs into a saucepan. (I punch holes in the most round end of the egg.) Fill with cold water (be sure the water covers the eggs by about two inches.)
2. Bring the water to full boil. Once it's boiling, put a lid on the saucepan and remove it from the burner. Let the eggs stand for 12 minutes still covered by the lid.
Note: I found that the more eggs I cooked the longer I had to let it stand. The first time I only had two eggs. Today I did six and found that the center was a little too soft. If fact, next time I will let them boil another minute or two and then let them set for 14 minutes.
3. Place the eggs under cold running water until they are completely cooled. Softly tap egg on a hard surface to crack the shell. (I start from end with puncture in it.) Continue peeling until the eggshell is completely gone.
Additional Tips from Great Day:
if they are not being eaten right
away (hard boiled eggs still in the
shell can be stored for one week).
I mark ends with 'HB' and date!
If your hard-boiled eggs are tough to peel, gently roll them in your hands to crack the entire shell.
Monday, January 28, 2013
Saturday, November 3, 2012
Tip: Honey Keeps Indefinitely:
...when stored in an airtight container in a cool, dark place.
...but if that hasn't worked
...you can re-liquefy it by setting the container in a pan of hot water over very low heat until it is liquid again.
Simple! I tried it-it works!
Note: I have it from a beekeeper...
Do Not put it in a microwave!
There is a good chance that you will burn it.
If you ignore this advice and put it in a microwave---
Nuke at full power for 30 to 60 seconds.
...but if that hasn't worked
...not to worry
Simple! I tried it-it works!
Note: I have it from a beekeeper...
Do Not put it in a microwave!
There is a good chance that you will burn it.
If you ignore this advice and put it in a microwave---
Nuke at full power for 30 to 60 seconds.
Saturday, June 23, 2012
Freezing Green Beans
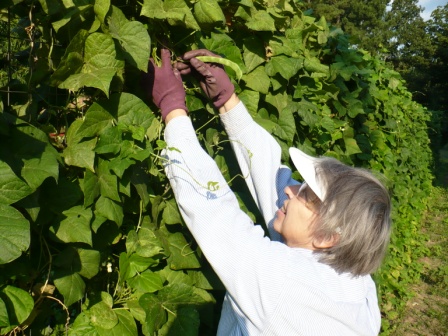
to pick the beans...
which we did!
Somehow we ended up with two grocery bags of beans for the two of us.
My niece informed us that they were best cooked within 24 hours. Well, no way we could eat all of those beans before they spoiled in the fridge.
Solution: Cook one bag and freeze the other.
I have never canned anything and it is on my 'not gonna do' list. I decided that I would freeze them. Actually it was quite easy though the instructions from my sister-in-law sounded labor intensive. It was not:
Step 1: Snap and remove the strings from the beans.
Step 2: Wash the beans thoroughly...they are dirty!
Step 3: Blanch the beans for about three minutes in a large pot of boiling water. Blanch means you are going to partially cook them really fast.
Step 4: While the beans are boiling prepare a large bowl of ice water.
Step 5: At the end of the three minutes remove the beans from the stove. Then, spoon them out and throw them into the ice water. I had so many beans the water got warm and I had to do a second bowl of ice water.
Step 6: From the ice water drain and dry the beans on a towel. Then blot them until they are dry with paper towels.
Step 7: Divide them and put them in freezer bags.
...and this is the tip:
The trick is to get all of the air out before you seal the bag. It is really quite easy when you use a straw. Place the straw down into the bag. Close the bag until the only space left is where the straw comes out. Then, suck the air out. You have to pinch the straw to take a breath until all of the air is gone. (kind of like those SpaceSaver Bags you see on TV.) Carefully remove the straw, closely the opening of the bag at the same time.
Voila!
Success!
I now have two bags of home grown beans in the freezer for the future.
We cooked a big pot of beans and had some for supper with plenty left over. I am thinking we will be eating green beans for a while!
Tuesday, March 20, 2012
What Oil Do I Use?
I am always at a loss when I am ready to cook with Olive Oil. Which one do I use for salads and which one do I use for cooking? I came across the answer in the January,2002, "Martha Stewart Living " magazine in her 'ask martha' column. I cut it out and have just unearthed it in my effort to do a little Spring cleaning.
The question was: "I am confused by the many types of oils on the market-avocado, grapeseed, nut oils, and so on. How do I now which to use and when? It was the 'so on' that caught my attention.
I am summarizing the highlights of her answer:
Cooking oils, like corn, canola, sunflower, peanut, safflower, grapeseed and vegetable oils, are sold in great quantities and at lower prices than their counterparts. They have a high "smoke point", which is the temperature at which the oil starts to smoke and burn.
Avocado oil is most often found in skin creams and lotions but can be used in the kitchen. I vote on it for soap. I have a passion for flavored soap.
Oils like olive and grapeseed can be used as a cooking oil or a flavor oil.
Dark olive oil, such as extra-virgin, tend to be aromatic and intensely flavored. They are great for lower-temperature sauteing or for salads and marinades.
I mainly use canola oil for frying...or spraying lightly to fry an egg. However, I keep olive oil in stock.
Now I know which is which if I just remember it when I get to the store.
The question was: "I am confused by the many types of oils on the market-avocado, grapeseed, nut oils, and so on. How do I now which to use and when? It was the 'so on' that caught my attention.
I am summarizing the highlights of her answer:
Cooking oils, like corn, canola, sunflower, peanut, safflower, grapeseed and vegetable oils, are sold in great quantities and at lower prices than their counterparts. They have a high "smoke point", which is the temperature at which the oil starts to smoke and burn.
Avocado oil is most often found in skin creams and lotions but can be used in the kitchen. I vote on it for soap. I have a passion for flavored soap.Oils like olive and grapeseed can be used as a cooking oil or a flavor oil.
Dark olive oil, such as extra-virgin, tend to be aromatic and intensely flavored. They are great for lower-temperature sauteing or for salads and marinades.
Light olive oil has been refined and doesn't have a strong flavor. It is best for higher-temperature sauteing, frying, or baking.
I mainly use canola oil for frying...or spraying lightly to fry an egg. However, I keep olive oil in stock. Now I know which is which if I just remember it when I get to the store.
Tuesday, November 8, 2011
Dicing/Chopping Onions
![]() |
| The Onion |
Step 2: Remove outer peel and first layer of onion.
Step 3: Cut into rings.
Step 4: Lay each ring flat and cut in half.
Step 5:Starting on one end of the half make small cuts. As you scoot the onion ring counter-clockwise cutting as you go, the rings
will come apart leaving
only small onion pieces onion.
Here are my "how to" pics!
Step 3-To cut uniform rings
watch the knife as it goes in between
the whole onion and the ring.
|
| Step 5 |
Tuesday, May 10, 2011
Cooking Spaghetti!
This is so easy that I probably don't need to repeat it here. However, for all you New-bee's I will anyway. We will take this in steps:
No. 1 Bring a pan of water to a rolling boil; add a little olive oil.
No. 2 Put the spaghetti* in slowly. I actually break mine in thirds-it goes in the pot much faster. Some traditionalists probably would shudder at this, but what can I say? Hey, I even cut mine up with a knife and fork when I eat it...boy, I think they are trembling now.
The tricky part for me is to get the right amount of spaghetti per person. There are just two of us and I invariably cook too much. Chuck is better at judging the amount that me so I call for is assistance at this step.
No. 3 Boil for 3 minutes. To keep the water from boiling over the pot, lay a wooden spoon across the pan.
No. 4 Remove from heat. Cover and let it sit for 10 minutes. It should be "al dente" as the traditionalists above would say!
No. 5 Strain with a strainer, empty all but a 1/4 cup of the water from the pot and set the strainer on top. Set back on the stove and serve the plates from there.
*I prefer Vermicelli or Angel Hair. I really dislike "fat, gunky" spaghetti.
No. 1 Bring a pan of water to a rolling boil; add a little olive oil.
![]() |
| Note pens in background... I craft while I cook! |
The tricky part for me is to get the right amount of spaghetti per person. There are just two of us and I invariably cook too much. Chuck is better at judging the amount that me so I call for is assistance at this step.
No. 3 Boil for 3 minutes. To keep the water from boiling over the pot, lay a wooden spoon across the pan.
No. 4 Remove from heat. Cover and let it sit for 10 minutes. It should be "al dente" as the traditionalists above would say!
No. 5 Strain with a strainer, empty all but a 1/4 cup of the water from the pot and set the strainer on top. Set back on the stove and serve the plates from there.
*I prefer Vermicelli or Angel Hair. I really dislike "fat, gunky" spaghetti.
Tuesday, April 5, 2011
Bacon, Bacon
Cut bacon in half when you open the package. You can fry in a skillet, bake in a conventional oven or cook in the microwave. It will not curl!
A little salt in a skillet will keep grease from splattering. Don't overdo the salt!
Cook in the microwave on a plate covered with paper towels. You can put several layers of bacon and towels to cook enough for several servings. Cover with a paper plate. It is best to set the time long enough to cook the entire batch. I have noticed if I keep nuking it one minute at a time, it will be too chewy. The time depends on the size of your microwave oven. You will get a feel for it over time. We still like bacon fried in a skillet best.
Keep end pieces and too thin/thick pieces in a bag in your freezer. I use them on top of my meat loaf, in green beans and topping my baked beans.
Happy Bacon cooking and eating!
A little salt in a skillet will keep grease from splattering. Don't overdo the salt!
Cook in the microwave on a plate covered with paper towels. You can put several layers of bacon and towels to cook enough for several servings. Cover with a paper plate. It is best to set the time long enough to cook the entire batch. I have noticed if I keep nuking it one minute at a time, it will be too chewy. The time depends on the size of your microwave oven. You will get a feel for it over time. We still like bacon fried in a skillet best.Keep end pieces and too thin/thick pieces in a bag in your freezer. I use them on top of my meat loaf, in green beans and topping my baked beans.
Happy Bacon cooking and eating!
Tuesday, March 8, 2011
Frozen Chicken for Dinner?
It is two hours until time to cook dinner...chicken fingers, grilled chicken, broiled chicken,
Shake N Bake chicken. And...the chicken is frozen. Never fear!
Put the frozen chicken in a pan and cover with cold water. Add salt from the box...a lot of salt. The chicken will thaw in no time. I think the salt provides natural heat to accelerate the thawing process.
You can only try it. It has worked for me for years!
Tuesday, January 25, 2011
My Favorite Thing Tip: 01252011
![]() |
| I know they look funny! But, easy to use! |
love
my
egg
poachers!
I got them on a shopping trip to the Heights with my daughter. (Aside: Love shopping in the Heights...part of my "small neighborhood")
We had been looking for an egg poacher of the metal variety...preferably a two egg one! No luck! (I should have checked EBay.) Thank goodness! I was forced to think outside the box. Then, I found the "pod".
I have used a one-egg poacher,
but now "I" am one-half of "Two".

I have also tried an egg poacher used in a microwave oven...I never got the hang of it.
Once a week...
poached eggs on English muffins
with ham and cheese.
Yummmmm!*
Also, posted on my blog:
"Eating In and Out and About".
Subscribe to:
Posts (Atom)
.jpg)


.jpg)
.jpg)
.jpg)
.jpg)