Showing posts with label Food. Show all posts

Thursday, March 17, 2022

CLEANING OUT YOUR FRIDGE

 If you are like me, you hate to throw away leftovers from your meals. I usually put them in a container with a lid. In a few days, weeks, months (?) you are looking for a quick snack or an extra something to add to your meal. Then, you remember those leftover green beans or fruit salad in your refrigerator. Ah, there they are. Hmmm, how long have they been there? My mantra-"When in doubt, throw it out."

How much good food do you throw out because you have no idea how long it has been in the fridge? My answer: I started dating the container. 
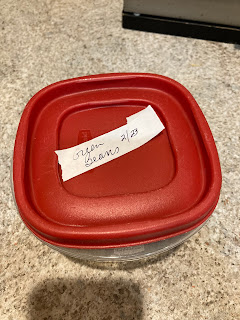


I keep some masking tape in a drawer by the fridge.

When I pack up my leftovers, I put a strip of tape* on it and add the date. 


*Extra tip: Turn the end of the masking tape down to make a tab. Then, you have a tab on the container that is easy to pull off when I use the food. Be sure and turn the tape under after you tear off the strip for your container. 

Happy Eating Leftovers!

Thursday, December 4, 2014

TINY TIDBIT FOR TODAY - Peeling a Banana

Yes, this really works!  Who knew? Start at the bottom when peeling a banana!*  

*Thanks to my friend Marilyn who sent me this tip!

Friday, May 2, 2014

Tiny Tidbit for Today - Avocado Dip

Put the avocado seed in the guacamole.  It will keep it from turning brown until it is served. 


(However, I have found that it doesn't work when saving it for another day.)   


Tuesday, March 25, 2014

Tiny Tidbit for Today - Stale Crackers

Stale crackers and chips can be revived.  Just heat them on a cookie sheet in the oven at 250 degrees for about five minutes. Voila...never throw out stale crackers or chips again!

Wednesday, January 29, 2014

TINY TIDBIT FOR TODAY - Burned Potatoes


If you scorch potatoes* while boiling them, put a piece of bread in the pot and cover with the lid. This will remove the scorch/burn taste.
*Applies to rice and other veggies.
Have a great day! Esmee

Wednesday, April 24, 2013

You Can Put Bananas in the Fridge

...they ripen more slowly in the refrigerator than on the counter.  The thing is they turn an ugly shade of brown and you think they are rotten.


However, if you put them in a white plastic grocery bag and wrap them tightly, they will not turn brown. 


Put them in your vegetable crisper. They will eventually ripen.  If you don't like mushy bananas, eat them within a week. 


This is a 'two-fer'...1. Yellow bananas and 2. Another way to recycle those plastic grocery bags.

Sunday, February 10, 2013

Pop the Cork

The three best tools I have to open a bottle of wine.  That is, a wine bottle with a cork!  Although, I am not against buying wine with a screw top.
1. Manual Corkscrew
2. Battery Operated
3. 'Gizmo' to remove the foil

Saturday, November 3, 2012

Tip: Honey Keeps Indefinitely:

...when stored in an airtight container in a cool, dark place.


...but if that hasn't worked


...not to worry

...you can re-liquefy it by setting the container in a pan of hot water over very low heat until it is liquid again.


Simple! I tried it-it works!


Note: I have it from a beekeeper...

          Do Not put it in a microwave!
         There is a good chance that you will burn it. 
          If you ignore this advice and put it in a microwave---
          Nuke at full power for 30 to 60 seconds.

Saturday, June 23, 2012

Freezing Green Beans

The first thing is 
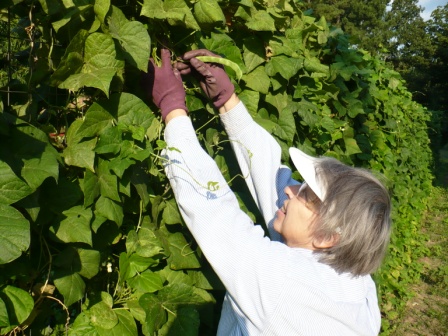
to pick the beans...
which we did!  


Somehow we ended up with two grocery bags of beans for the two of us.  

My niece informed us that they were best cooked within 24 hours.  Well, no way we could eat all of those beans before they spoiled in the fridge.


Solution: Cook one bag and freeze the other.

I have never canned anything and it is on my 'not gonna do' list.  I decided that I would freeze them. Actually it was quite easy though the instructions from my sister-in-law sounded labor intensive.  It  was not:


Step 1: Snap and remove the strings from the beans.
Step 2: Wash the beans thoroughly...they are dirty!
Step 3: Blanch the beans for about three minutes in a large pot of boiling water. Blanch means you are going to partially cook them really fast.
Step 4: While the beans are boiling prepare a large bowl of ice water.
Step 5: At the end of the three minutes remove the beans from the stove.  Then, spoon them out and throw them into the ice water.  I had so many beans the water got warm and I had to do a second bowl of ice water.
Step 6: From the ice water drain and dry the beans on a towel. Then blot them until they are dry with paper towels.

Step 7: Divide them and put them in freezer bags.  
...and this is the tip: 
The trick is to get all of the air out before you seal the bag.  It is really quite easy when you use a straw.  Place the straw down into the bag. Close the bag until the only space left is where the straw comes out.  Then, suck the air out.  You  have to pinch the straw to take a breath until all of the air is gone.  (kind of like those SpaceSaver Bags you see on TV.)  Carefully remove the straw, closely the opening of the bag at the same time.


Voila!  
Success!  
I now have two bags of home grown beans in the freezer for the future.  


We cooked a big pot of beans and had some for supper with plenty left over.  I am thinking we will be eating green beans for a while!